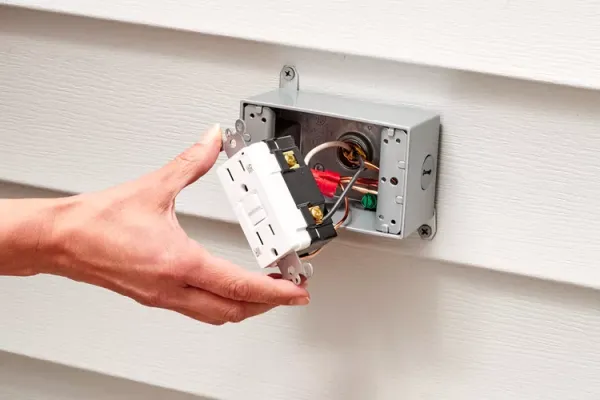
Extending Power Outdoors: Tapping an Interior Circuit for a New Weatherproof Outlet
Homeowners can add an outdoor electrical outlet by tapping into an existing interior circuit, provided the circuit has sufficient capacity and is not dedicated to specific appliances. This guide outlines the step-by-step process, including necessary materials, safety checks, and code-compliant installation of a GFCI-protected, weatherproof outlet.
Adding an outdoor electrical outlet to a home often seems like a major project, but in many cases it can be accomplished by extending an existing interior circuit rather than installing a new one. This approach, which typically takes one to three hours and costs about $50 in materials, is feasible when the existing circuit has enough capacity and is a standard receptacle circuit. However, it is not permissible to tap into bathroom or kitchen receptacle circuits, nor into dedicated circuits intended for a single appliance.
The key to this project is identifying an interior outlet that aligns with the desired outdoor location. Ideally, the new outdoor outlet should be placed on the same side of the wall stud and within the same stud cavity as the interior outlet, avoiding the need to drill through a stud. This positioning simplifies the routing of the new cable.
Code Requirements and Safety Considerations
All outdoor outlets must be protected by a ground-fault circuit-interrupter (GFCI), and the type of weatherproof cover depends on the exposure. If the outlet is shielded from direct weather, such as under a porch roof, a damp-rated cover suffices. If it is fully exposed to the elements, an in-use cover rated for wet locations is required. The new cable and GFCI receptacle must match the amperage of the existing circuit: 12-gauge cable with a 20-amp receptacle for a 20-amp circuit, and 14-gauge cable with a 15-amp receptacle for a 15-amp circuit. Note that the National Electrical Code permits 15-amp outlets on 20-amp circuits in residential settings.
Before beginning any work, the power to the circuit must be turned off at the breaker panel. A non-contact voltage tester should be used to confirm that no voltage is present at the outlet and its wires. This step is non-negotiable for safety.

Step-by-Step Installation Process
After confirming the power is off, the interior outlet is disconnected and removed from its box. If the box is metal, a knockout is removed from the back to create an opening to the exterior. A hole is then drilled through the wall from the interior to the exterior, using a long 1/4-inch bit, and enlarged to 3/4-inch on the outside to accommodate the new cable.
Next, a length of NM-B cable is cut to extend from the interior box to the exterior location, with at least 8 inches of excess at each end. The cable is fed through the knockout and the wall hole. If the boxes are not aligned, a bent metal coat hanger can be used to fish the cable through the wall cavity. The cable is secured to the interior box with a clamp.
To connect the new cable to the existing circuit, pigtail wires are prepared. A 6-inch piece of cable is stripped to create black, white, and bare copper pigtails. The interior end of the new cable is stripped, and the black wires from the existing circuit, the new cable, and the pigtail are joined with a wire connector. The same is done for the white and ground wires. If the interior box is metal, a grounding pigtail must be attached to the box and connected to the ground wires.
The interior outlet is then rewired, connecting the ground pigtail to the green screw, the white pigtail to a silver terminal, and the black pigtail to a brass terminal. The outlet is tucked back into the box and the cover plate replaced.

On the exterior, a weatherproof box is prepared by removing a knockout and feeding the cable through, securing it with a clamp. A bead of silicone caulk is applied to the back of the box before mounting it to the wall with exterior screws. The GFCI outlet is then wired: the ground wire to the green screw, the white wire to the silver LINE terminal, and the black wire to the brass LINE terminal. If the outdoor box is metal, additional grounding pigtails are required.
Once the outlet is secured and the cover installed, the circuit breaker is turned back on. Both the interior and exterior outlets should be tested for voltage, and the GFCI's TEST and RESET buttons should be checked to ensure proper operation.
This project is rated as intermediate in skill level, requiring basic electrical knowledge and tools such as a hammer drill, cable ripper, and wire strippers. Homeowners comfortable with these tasks can extend their outdoor power access for lighting, tools, or entertainment, provided they adhere to local codes and safety practices.
Comments 0